
Di artikel ini saya akan menjelaskan cara menginstall wordpress di rockylinux 9 dengan apache php mysql. Rockylinux 9 server merupakan pilihan hosting vps server yang tepat untuk menjalankan wordpress anda karena memiliki tingkat keamanan yang cukup bagus sehingga blog wordpress anda bisa lebih sedikit aman.
Berikut ini minimal spesifikasi rockylinux 9 server agar anda dapat menginstall dan menjalankan wordpress di hosting vps tersebut.
- RAM minimal 2 Gigabyte.
- Ruang penyimpanan berupa harddisk atau ssd kurang lebih 10 gigabyte.
- Memiliki akses root ke vps server atau user yang memiliki akses privilege sebagai root.
Jika rockylinux 9 server anda memiliki spesifikasi seperti tersebut di atas, berikut langkah-langkah untuk menginstall wordpress menggunakan apache, php dan mysql di rockylinux 9 server.
1. Login ke hosting vps server
ssh root@ip-address-vps2. Update rockylinux 9 server
yum update3. Install apache
Untuk menginstall apache, ketik baris perintah berikut. Kemudian tekan enter.
yum install httpd4. Jalankan apache
Untuk menjalankan apache, ketikkan baris perintah berikut. Kemudian tekan enter.
systemctl start httpd5. Enable apache
Untuk mengenable apache, ketikkan baris perintah berikut. Kemudian tekan enter.
systemctl enable httpd6. Install php
Di tutorial ini blog wordpress akan menggunakan php 8.3. Untuk menginstall php 8.3 di rockylinux 9 server, anda harus menginstall paket repository remirepo. Untuk menginstall paket repository remirepo, ikuti langkah-langkah berikut ini.
- Aktifkan crb.
dnf config-manager --set-enabled crb- Install repository epel-release.
dnf install https://dl.fedoraproject.org/pub/epel/epel-release-latest-9.noarch.rpm- Install repository remi.
dnf install https://rpms.remirepo.net/enterprise/remi-release-9.rpm- Aktifkan modul php 8.3.
dnf module switch-to php:remi-8.3- Setelah anda mengaktifkan modul php 8.3, anda bisa menginstall php 8.3.
7. Install php 8.3
Untuk menginstall php 8.3, ketik baris perintah berikut di bawah ini. Kemudian tekan enter.
dnf module install php:remi-8.38. Install ekstensi modul php 8.3
Modul ini diperlukan agar blog wordpress berjalan lancar di server yang anda jalankan.
yum install php-cli php-mysql php-common php-imap php-redis php-xml php-zip php-mbstring php-intl php-curl9. Restart apache
Untuk merestart apache, ketik baris perintah berikut kemudian tekan enter.
systemctl restart httpd10. Edit file konfigurasi apache
File konfigurasi apache terletak di lokasi /etc/httpd/conf.d/welcome.conf.
nano /etc/httpd/conf.d/welcome.conf11. Perbaiki baris berikut
Cari baris berikut ini di file konfigurasi apache /etc/httpd/conf.d/welcome.conf.
<LocationMatch "^/+$">
    Options -Indexes
    ErrorDocument 403 /.noindex.html
</LocationMatch></p>
<p><Directory /usr/share/httpd/noindex>
    AllowOverride None
    Require all granted
</Directory></p>
<p>Alias /.noindex.html /usr/share/httpd/noindex/index.html
Alias /poweredby.png /usr/share/httpd/icons/apache_pb3.png
Alias /system_noindex_logo.png /usr/share/httpd/icons/system_noindex_logo.png
12. Ubah baris di atas
Masih di file konfigurasi apache /etc/httpd/conf.d/welcome.conf. Ubah baris yang tersebut di atas tersebut menjadi seperti berikut ini.
#<LocationMatch "^/+$">
#    Options -Indexes
#    ErrorDocument 403 /.noindex.html
#</LocationMatch></p>
<p>#<Directory /usr/share/httpd/noindex>
#    AllowOverride None
#    Require all granted
#</Directory></p>
<p>#Alias /.noindex.html /usr/share/httpd/noindex/index.html
#Alias /poweredby.png /usr/share/httpd/icons/apache_pb3.png
#Alias /system_noindex_logo.png /usr/share/httpd/icons/system_noindex_logo.png
13. Restart apache
Untuk merestart apache, ketik baris perintah berikut kemudian tekan enter.
systemctl restart httpd14. Buat file info.php
Isi file info.php dengan script php berikut ini.
nano /var/www/html/info.phpScript php yang dimaksud.
<?php

// Show all information, defaults to INFO_ALL
phpinfo();

// Show just the module information.
// phpinfo(8) yields identical results.
phpinfo(INFO_MODULES);

?>
15. Cek website
Sekarang kunjungi website anda di alamat website http://ip-adresss-server/info.php.
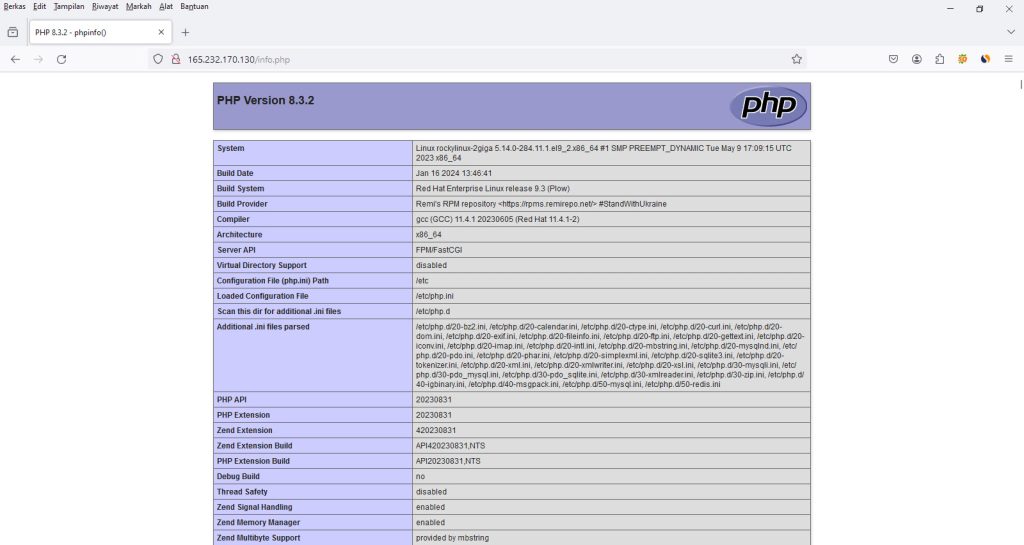
Jika gambar di atas yang muncul, itu artinya anda telah berhasil menginstall php 8.3 di Rockylinux 9 server.
16. Install mysql
Untuk menginstall mysql, ketik baris perintah berikut kemudian tekan enter.
yum install mysql mysql-server18. Amankan MySQL
Jalankan security script untuk mensetting aplikasi mysql.
mysql_secure_installationBerikut ini contoh setting mysql yang bisa anda gunakan.
</p>
<p>Securing the MySQL server deployment.</p>
<p>Connecting to MySQL using a blank password.</p>
<p>VALIDATE PASSWORD COMPONENT can be used to test passwords
and improve security. It checks the strength of password
and allows the users to set only those passwords which are
secure enough. Would you like to setup VALIDATE PASSWORD component?</p>
<p>Press y|Y for Yes, any other key for No:</p>
<p>There are three levels of password validation policy:</p>
<p>LOW    Length >= 8
MEDIUM Length >= 8, numeric, mixed case, and special characters
STRONG Length >= 8, numeric, mixed case, special characters and dictionary file</p>
<p>Please enter 0 = LOW, 1 = MEDIUM and 2 = STRONG: 0
Please set the password for root here.</p>
<p>New password:</p>
<p>Re-enter new password:</p>
<p>Estimated strength of the password: 25
Do you wish to continue with the password provided?(Press y|Y for Yes, any other key for No) : y
 ... Failed! Error: Your password does not satisfy the current policy requirements</p>
<p>New password:</p>
<p>Re-enter new password:</p>
<p>Estimated strength of the password: 50
Do you wish to continue with the password provided?(Press y|Y for Yes, any other key for No) : Y
By default, a MySQL installation has an anonymous user,
allowing anyone to log into MySQL without having to have
a user account created for them. This is intended only for
testing, and to make the installation go a bit smoother.
You should remove them before moving into a production
environment.</p>
<p>Remove anonymous users? (Press y|Y for Yes, any other key for No) : Y
Success.</p>
<p>Normally, root should only be allowed to connect from
'localhost'. This ensures that someone cannot guess at
the root password from the network.</p>
<p>Disallow root login remotely? (Press y|Y for Yes, any other key for No) : Y
Success.</p>
<p>By default, MySQL comes with a database named 'test' that
anyone can access. This is also intended only for testing,
and should be removed before moving into a production
environment.</p>
<p>Remove test database and access to it? (Press y|Y for Yes, any other key for No) : Y
 - Dropping test database...
Success.</p>
<p> - Removing privileges on test database...
Success.</p>
<p>Reloading the privilege tables will ensure that all changes
made so far will take effect immediately.</p>
<p>Reload privilege tables now? (Press y|Y for Yes, any other key for No) : Y
Success.</p>
<p>All done!</p>
<p>
Berikut ini keterangan yang berkaitan dengan setting awal aplikasi mysql ketika anda menjalankan security script.
- Untuk memilih password mysql ada 3 pilihan jenis password yaitu : 0 = LOW, 1 = MEDIUM and 2 = STRONG:. Saya meggunakan jenis password dengan nilai 0 atau low. Karena membuat password yang memiliki nilai 0 akan lebih mudah.
- Anda akan diminta untuk membuat password : New password:
- Ketik ulang password : Re-enter new password:
- Untuk lain-lainnya, anda dapat menggunakan seperti contoh setting mysql di atas.
18. Jalankan MySQL
Untuk menjalankan mysql, ketik baris perintah berikut kemudian tekan enter.
systemctl start mysqld19. Enable MySQL
Untuk mengenable mysql, ketik baris perintah berikut kemudian tekan enter.
systemctl enable mysqld20. Buat database wordpress
Buat database untuk blog wordpress. Untuk membuat database untuk blog wordpress, ikuti langkah-langkah berikut di bawah ini.
- Login ke mysql.
mysql -u root -p- Masukkan password yang dibuat tadi.
- Buat database.
CREATE DATABASE dbwprocky;- Buat user untuk database tersebut.
CREATE USER 'userwprocky'@'localhost' IDENTIFIED BY 'vtba557#&';- Buat privilege agar user database tersebut dapat terhubung ke blog database yaitu dbwpdebian.
GRANT ALL PRIVILEGES ON dbwprocky.* TO 'userwprocky'@'localhost';flush privileges;21. Unduh wordpress terbaru
Download wordpress yang terbaru yang ada di website https://id.wordpress.org/download.
wget https://id.wordpress.org/latest-id_ID.zip22. Ekstrak file wordpress tersebut
unzip latest-id_ID.zip23. Setting wp-config
Kopi file wp-config-sample.php menjadi wp-config.php yang terletak di folder wordpress.
cp wp-config-sample.php wp-config.php24. Setting wp-config install wp
Setting wp-config.php untuk menginstall wordpress.
- Cari baris berikut.
define( 'DB_NAME', 'database_name_here' );- Ubah menjadi seperti berikut.
define( 'DB_NAME', 'dbwprocky' );- Kemudian cari baris berikut.
define( 'DB_USER', 'username_here' );- Ubah menjadi seperti berikut.
define( 'DB_USER', 'userwprocky' );- Kemudian cari baris berikut.
define( 'DB_PASSWORD', 'password_here' );- Ubah menjadi seperti berikut.
define( 'DB_PASSWORD', 'vtba557#&' );- Kemudian cari baris berikut.
define( 'AUTH_KEY',         'put your unique phrase here' );
define( 'SECURE_AUTH_KEY',  'put your unique phrase here' );
define( 'LOGGED_IN_KEY',    'put your unique phrase here' );
define( 'NONCE_KEY',        'put your unique phrase here' );
define( 'AUTH_SALT',        'put your unique phrase here' );
define( 'SECURE_AUTH_SALT', 'put your unique phrase here' );
define( 'LOGGED_IN_SALT',   'put your unique phrase here' );
define( 'NONCE_SALT', 'put your unique phrase here' );- Kunjungi website https://api.wordpress.org/secret-key/1.1/salt. Ganti baris script kode di atas dengan baris script kode yang anda dapatkan di website https://api.wordpress.org/secret-key/1.1/salt.
define('AUTH_KEY',         'M-qf?>%).KsYH`n+B06C-W5|@.s;S41/G.|f]eS-h]Y#&c$A>.hPr+:(9K)=:NKG');
define('SECURE_AUTH_KEY',  'ey]#)UY_R)&+vJeuP})|Lmv-C<,?D@]M$U1/MjywChS.yQcqz#P p? 2zT).vLM,');
define('LOGGED_IN_KEY',    '@z$d5L*cXm-0E8s=&aX-=MS=]U#sB%A>4?&og(*_RgGB!K^,zM=F0!cII tJ5Y3=');
define('NONCE_KEY',        'U6>[6wY4M>@+w/VH.|N^V;x+7GI#`tNvppLPai}2;9y+R0Aw8+ 9:%&+Q1zL(Fxo');
define('AUTH_SALT',        '^MZuok2|({RJ R|={|:U4WVGnbW+s<rD_}1XR4{-qR]]g2<Z;=xZjVKd+yF=4|aW');
define('SECURE_AUTH_SALT', '|o0~EC?f|xJca-GAbQ*K1*X/@c@gTy%+!{<[R5pI,ztyt{e=@k*pn~>N]l`IfN*$');
define('LOGGED_IN_SALT',   'GnT=Tp8}9(P:*0ctpgQaSBfrN}%BNUWsLy5 TC|Ll$Lk)D;o;%cZ$Q?!Su6F{S]1');
define('NONCE_SALT',       '/y_fG(3a!U_$&1vWlxNhXdPc>RC#1/=*i-9wlF7-|85&nkX B8N,BUU_~8]Q}xx.');
25. Kopi file wordpress
Kopi semua file wordpress ke folder /var/www/html.
rm -r /var/www/html/**cp -r wordpress/** /var/www/html26. Install wordpress
Kunjungi alamat website http://ip-address-server untuk menginstall wordpress. Berikut tampilan halaman awal proses install wordpress.

Lengkapilah form-form berikut ini.
- Judul situs : Blog Bagus.
- Nama Pengguna : adminwprocky9.
- Sandi. Software blog wordpress biasanya menyediakan sandi secara random saat pertama kali install wordpress. Di tutorial ini kata sandi yang tersedia adalah : j1n)j^s$BHgSDWKqVh.
- Email Anda : emailpengguna@gmail.com.
Setelah semuanya sudah lengkap, klik tombol ‘Install WordPress’. Apabila anda berhasil menginstall wordpress, anda akan mendapatkan gambar seperti berikut di bawah ini.

27. Login admin wordpress
Login ke bagian admin blog wordpress. Di bagian admin blog wordpress anda bisa membuat artikel yang akan diterbitkan, kategori, tag, mengganti template dan lain sebagainya. Tekan tombol ‘Log Masuk’ untuk login ke bagian admin wordpress. Masukkan user dan password admin yang barusan anda buat.

Berikut ini bagian admin blog wordpress jika anda berhasil login ke bagian admin blog wordpress.
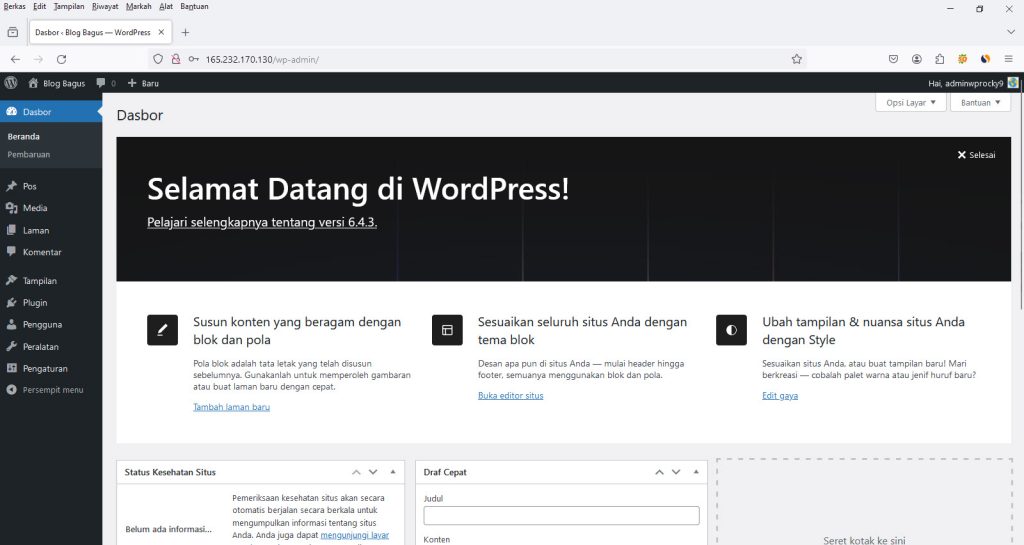
Berikut ini tampilan halaman depan blog wordpress versi 6.4.3. Di versi ini secara default blog wordpress menggunakan template yang bernama twenty twenty four.

Demikian tutorial singkat tentang cara menginstall wordpress di rockylinux 9 server dengan apache php mysql. Di tutorial ini anda menginstall wordpress di ip-address hosting rockylinux 9 server. Jika anda memiliki domain, anda bisa mengubah instalasi tersebut ke domain yang anda sewa. Sehingga apabila anda mengunjungi domain yang anda sewa, hasilnya seperti yang di tutorial ini.
Tinggalkan Balasan